How To Set Up Django with Postgres, Nginx, and Daphne (Django Channels) on Ubuntu 20.04
In this tutorial you will learn how to deploy your django (django channels) web app with daphne, postgresql and nginx on VPS
Introduction:
Django is python web framework.
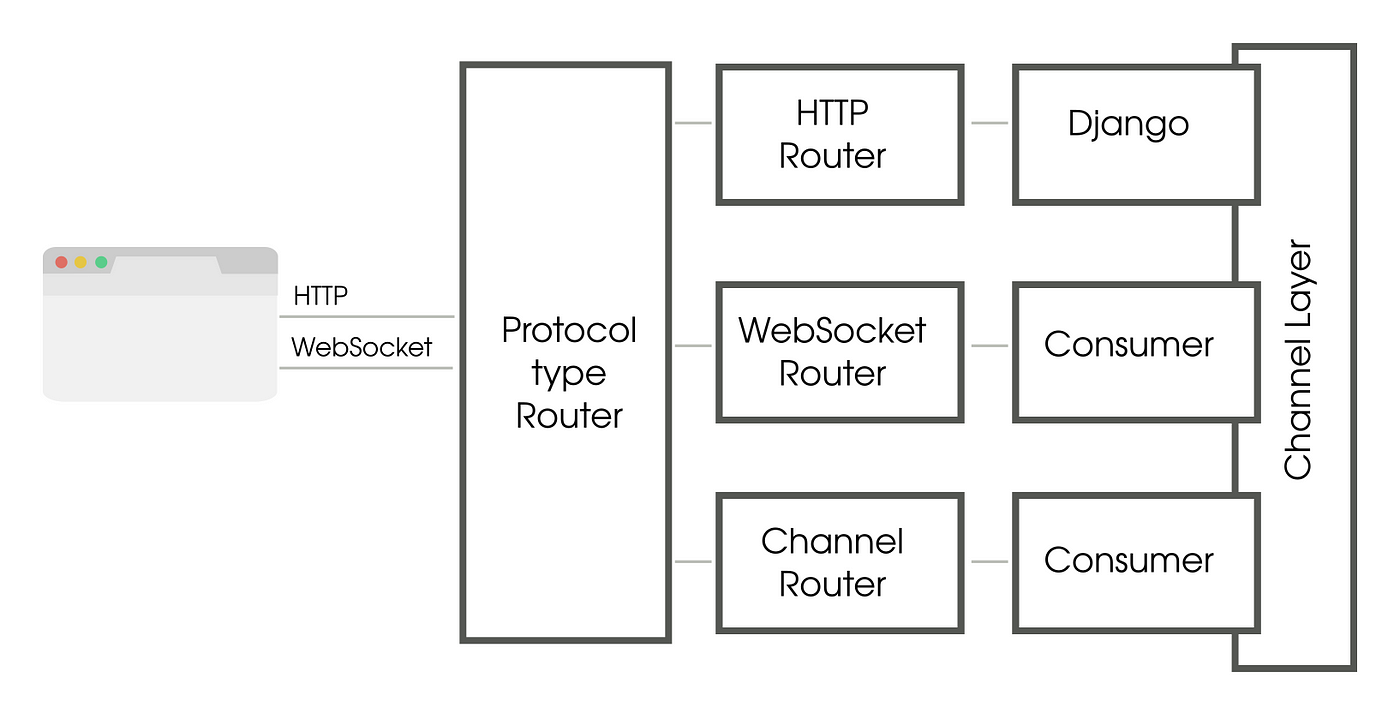
Django Channels augments Django to bring WebSocket, long-poll HTTP, task offloading and other async support to your code
PostgreSQL, also known as Postgres, is a free and open-source relational database management system.
Nginx, is a web server that can also be used as a reverse proxy, load balancer, mail proxy and HTTP cache.
Daphne is a HTTP, HTTP2 and WebSocket protocol server for ASGI and ASGI-HTTP, developed to power Django Channels.
We will use these technologies together to deploy our async Django web app.
Prerequisites:
If you are not already connected to your server, log in now as the root user using the following command (substitute the highlighted portion of the command with your server’s public IP address):
ssh root@your_server_ip
Once you are logged in as root, we’re prepared to add the new user account. In the future, we’ll log in with this new account instead of root.
This example creates a new user called sammy, but you should replace that with a username that you like:
adduser sammy
Now, we have a new user account with regular account privileges. However, we may sometimes need to do administrative tasks.
To avoid having to log out of our normal user and log back in as the root account, we can set up what is known as superuser or root privileges for our normal account. This will allow our normal user to run commands with administrative privileges by putting the word sudo before each command.
As root, run this command to add your new user to the sudo group (substitute the highlighted username with your new user):
usermod -aG sudo sammy
Initialize Ubuntu packages
To begin the process, we’ll download and install all of the items we need from the Ubuntu repositories. We will use the Python package manager pip to install additional components a bit later.
We need to update the local apt package index and then download and install the packages. The packages we install depend on which version of Python your project will use.
sudo apt update
sudo apt install python3-pip python3-dev libpq-dev postgresql postgresql-contrib nginx curl
Creating the PostgreSQL Database
Log into an interactive Postgres session by typing:
sudo -u postgres psql
First, create a database for your project:
CREATE DATABASE myproject;
Next, create a database user for our project. Make sure to select a secure password:
CREATE USER myprojectuser WITH PASSWORD 'password';
We are setting the default encoding to UTF-8, which Django expects. We are also setting the default transaction isolation scheme to “read committed”, which blocks reads from uncommitted transactions. Lastly, we are setting the timezone. By default, our Django projects will be set to use UTC
ALTER ROLE myprojectuser SET client_encoding TO 'utf8';
ALTER ROLE myprojectuser SET default_transaction_isolation TO 'read committed';
ALTER ROLE myprojectuser SET timezone TO 'UTC';
Now, we can give our new user access to administer our new database:
GRANT ALL PRIVILEGES ON DATABASE myproject TO myprojectuser;
When you are finished, exit out of the PostgreSQL prompt by typing:
\q
Initialize Django Project
in your django project, set debug mode to False and allow your hosts, then set database like so:
DATABASES = {
'default': {
'ENGINE': 'django.db.backends.postgresql_psycopg2',
'NAME': 'myproject',
'USER': 'myprojectuser',
'PASSWORD': 'password',
'HOST': 'localhost',
'PORT': '',
}
}
Checkout Deployment checklist in Django documentation:
https://docs.djangoproject.com/en/3.1/howto/deployment/checklist/
Then commit your changes and push them to your Github repository.
Creating a Python Virtual Environment
Upgrade pip and install the package by typing:
sudo -H pip3 install —-upgrade pip
sudo -H pip3 install virtualenv
With virtualenv installed, we can start forming our project. Create and move into a directory where we can keep our project files:
mkdir ~/myprojectdir
cd ~/myprojectdir
Within the project directory, create a Python virtual environment by typing:
virtualenv myprojectenv
Before we install our project’s Python requirements, we need to activate the virtual environment. You can do that by typing:
source myprojectenv/bin/activate
With your virtual environment active, install Daphne, and the psycopg2 PostgreSQL adaptor with the local instance of pip:
pip install daphne psycopg2-binary
Initialize Django Project
Clone your Django project from github for example:
git clone <github_repo_url>
cd django_project_dir
Install dependencies from requirements.txt using pip
pip install -r requirements.txt
Then makemigrations then migrate and don’t forget to collectstatic because now we are in production, then create a superuser to access to the admin panel.
python manage.py makemigrations
python manage.py migrate
python manage.py collectstatic
python manage.py createsuperuser
In order to test the server, we’ll have to allow access to the port we’ll be using.
Create an exception for port 8000 by typing:
sudo ufw allow 8000
Finally, you can test our your project by starting up the Django development server with this command:
python manage.py runserver 0.0.0.0:8000
In your web browser, visit your server’s domain name or IP address followed by :8000:
http://server_domain_or_IP:8000
The last thing we want to do before leaving our virtual environment is test Daphne to make sure that it can serve the application. We can do this by entering our project directory and using daphne to load the project’s ASGI module:
daphne -p 8000 -b 0.0.0.0 myproject.asgi:application
When you are finished testing, hit CTRL-C in the terminal window to stop Daphne.
We’re now finished configuring our Django application. We can back out of our virtual environment by typing:
deactivate
Creating systemd Socket and Service Files for Daphne
Start by creating and opening a systemd socket file for Daphne with sudo privileges:
sudo nano /etc/systemd/system/daphne.socket
file content is:
[Unit]
Description=daphne socket
[Socket]
ListenStream=/run/daphne.sock
[Install]
WantedBy=sockets.target
Next, create and open a systemd service file for Daphne with sudo privileges in your text editor. The service filename should match the socket filename with the exception of the extension:
sudo nano /etc/systemd/system/daphne.service
file content is:
[Unit]
Description=daphne daemon
Requires=daphne.socket
After=network.target
[Service]
Type=simple
User=sammy
WorkingDirectory=/home/sammy/myprojectdir/django_project_dir
ExecStart=/home/sammy/myprojectdir/myprojectenv/bin/daphne -b 0.0.0.0 -p 8000 source.asgi:application
[Install]
WantedBy=multi-user.target
We can now start and enable the daphne socket. This will create the socket file at /run/daphne.sock now and at boot. When a connection is made to that socket, systemd will automatically start the daphne.service to handle it:
sudo systemctl start daphne.socket
sudo systemctl enable daphne.socket
Check the status of the process to find out whether it was able to start:
sudo systemctl status daphne.socket
Next, check for the existence of the daphne.sock file within the /run directory:
file /run/daphne.sock
If the systemctl status command indicated that an error occurred or if you do not find the daphne.sock file in the directory, it’s an indication that the Daphne socket was not able to be created correctly. Check the Daphne socket’s logs by typing:
sudo journalctl -u daphne.socket
Take another look at your /etc/systemd/system/daphne.socket file to fix any problems before continuing.
Currently, if you’ve only started the daphne.socket unit, the daphne.service will not be active yet since the socket has not yet received any connections. You can check this by typing:
sudo systemctl status daphne
To test the socket activation mechanism, we can send a connection to the socket through curl by typing:
curl —-unix-socket /run/daphne.sock localhost
You should receive the HTML output from your application in the terminal. This indicates that Daphne was started and was able to serve your Django application. You can verify that the Daphne service is running by typing:
sudo systemctl status daphne
If the output from curl or the output of systemctl status indicates that a problem occurred, check the logs for additional details:
sudo journalctl -u daphne
Check your /etc/systemd/system/daphne.service file for problems. If you make changes to the /etc/systemd/system/daphne.service file, reload the daemon to reread the service definition and restart the Daphne process by typing:
sudo systemctl daemon-reload
sudo systemctl restart daphne
Make sure you troubleshoot the above issues before continuing.
Configure Nginx to Proxy Pass to Daphne
Now that Daphne is set up, we need to configure Nginx to pass traffic to the process.
Start by creating and opening a new server block in Nginx’s sites-available directory:
sudo nano /etc/nginx/sites-available/myproject
file content is:
upstream channels-backend {server localhost:8000;}
server {
listen 80;
server_name server_domain_or_IP;
location = /favicon.ico { access_log off; log_not_found off; }
location /static/ {
 root /home/sammy/myprojectdir/django_project_dir;
}
location /media/ {
 root /home/sammy/myprojectdir/django_project_dir;
}
location / {
 proxy_pass http://channels-backend;
 proxy_http_version 1.1;
 proxy_set_header Upgrade $http_upgrade;
 proxy_set_header Connection "Upgrade";
 proxy_set_header X-Forwarded-For $proxy_add_x_forwarded_for;
 proxy_set_header Host $http_host;
 proxy_redirect off;
}
}
We can enable the file by linking it to the sites-enabled directory:
sudo ln -s /etc/nginx/sites-available/myproject /etc/nginx/sites-enabled
Test your Nginx configuration for syntax errors by typing:
sudo nginx -t
If no errors are reported, go ahead and restart Nginx by typing:
sudo systemctl restart nginx
Finally, we need to open up our firewall to normal traffic on port 80. Since we no longer need access to the development server, we can remove the rule to open port 8000 as well:
sudo ufw delete allow 8000
sudo ufw allow 'Nginx Full'
Notes
You should now be able to go to your server’s domain or IP address to view your application.
If you make any edits in nginx configuration file, use this command:
sudo systemctl restart nginx
If you make any edits in your django project, use these command:
sudo systemctl daemon-reload
sudo systemctl restart daphne
This article is extended from this article:
https://www.digitalocean.com/community/tutorials/how-to-set-up-django-with-postgres-nginx-and-gunicorn-on-ubuntu-20-04